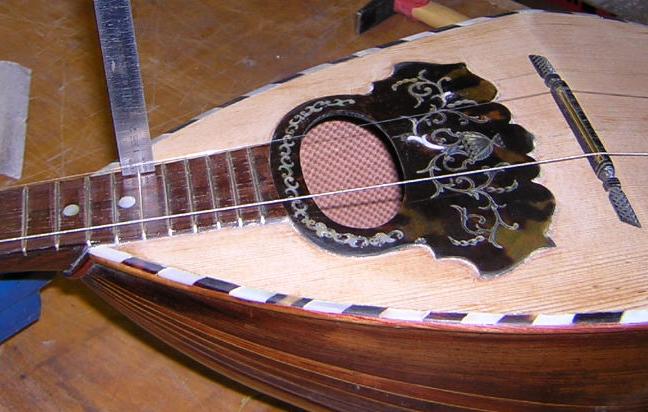
Home     Mandolin Bridge Fitting    Setting up

      When fitting a bridge to any floating bridge instrument, there are some fixed and some preferential elements. The style, material and size are matters of individual choice, but remember different bridges will give different effects. Unlike the nut, it is always part of the sound equation. It depends on the sound you are looking for, and it may take several different bridges to achieve what you want. The position, height and string spacing of the bridge are determined much more by the attributes of the instrument, though there is some latitude in how high the action will be. If the bridge is badly fitted, never mind how good the instrument is, it will sound terrible, because the bridge is the element that transfers the strings' vibrations to the sound box for amplification. Below is an outline of the technique I use to fit bridges to both new and old instruments. I have found, often to my cost, that when you want to know how something is done, the 'expert' sometimes inadvertently assumes some knowledge...... very frustrating if you don't have it. So, for the purposes of this page, I have assumed no prior knowledge whatever! If you have some, just skip those bits. I have also tried to outline a method that can be tackled by the least 'DIY-minded'. I hope I have succeeded.

     Tools:    You will need a few basic bits to accomplish this.... file, rasp, sandpaper (80-600), masking tape, long straight edge, small steel rule (showing mm.), craft knife, pencil, needle files (from most craft shops), a vice is useful.
    What are we trying to achieve? When we have finished we aim to have a bridge, where.... 
  • 1) the strings sit evenly spaced ON the saddle; 
  • 2) the foot of the bridge itself makes good clean contact with the sound table's often curved top; 
  • and 3) the height of the strings above the 12th fret, gives us a low, easy, playing action. 

(NB. Arch tops are clearly domed, but even Neapolitan and flatbacks, except for the cheapies, are also domed. They usually have 3 bracing struts underneath; the shortest is under the end of the fingerboard and flat, but the other two are between the sound hole and bridge, and are domed to brace the table, if only to a height of a few millimetres.)

   How do I know what strings to use?    See the tuning page for string options for the different members of the 'floating bridge' family. Several of the mandolin family of instruments have different tuning possibilities.
   How do I know where the bridge is supposed to be?    The scale length of an instrument, is theoretically defined as twice the distance between 0 fret (or nut if there is no 0 fret) and 12th fret. Thus a typical Neapolitan with a 0 to 12th fret length of 165mm, has a notional scale length of 330mm. This is nominally where the bridge lives, but may need to be adjusted back a little, later, particularly on the bass side. The reason is that the scale length is the theoretical distance required for a given string length to vibrate at a certain frequency. The problem is that the string thickness has the tendency to inhibit its vibration. Hence, to vibrate at the correct frequency, a heavier string often needs a slightly longer length in which to do so. Thus the use of compensated bridges. It is unlikely on a mandolin, that the bridge should need to be pushed back by more than 3mm. It should never be found on the 'wrong side of the cant' as the mandolin is not designed to cope with bridge stress there.


Bridge Fitting

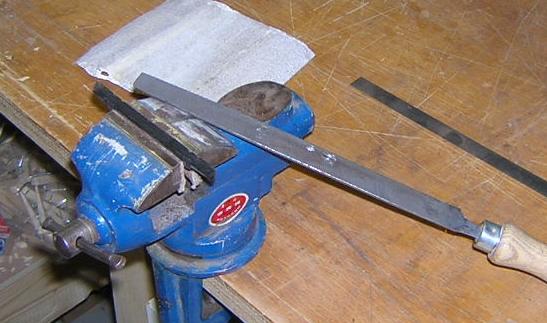
  Fitting the Bridge

   Step 1: assuming you don't know the bridge height, place the long straight edge on the nut or 0 fret, raising it in the centre so that you are about 3 mm above 12th fret, and measure the height above the table at the bridge position. (An extra pair of hands is useful here!) This gives you the approximate height of the top of the bridge saddle as a starting point.

   Step 2: chisel and/or file down your bridge foot until it is just a little bigger than you need, (a vice will help here!) Aim to get a dip to the centre to begin fitting to the curved top. Keep going back to the instrument with the bridge, to check where the high spots on the foot are. Chisel and/or file the centre much more than the ends to achieve a curve.   

Don't cut it down too fine yet!!


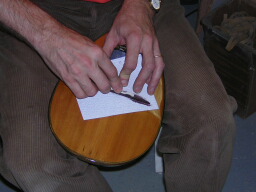
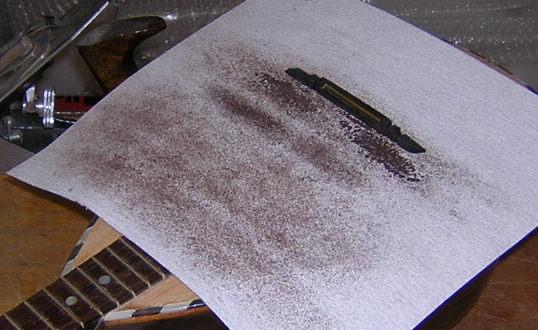
  Step 3: hold or tape the sandpaper tightly to the table, and start rubbing the bridge back and forth across the sandpaper at the approximate bridge position. Use short strokes of perhaps 2-3cms back and forth. This should eventually accurately contour the bridge's foot to the shape of the table once it is roughly chiselled/filed to shape.

    I have found the easiest approach to this is to place the instrument in your lap between your legs, with the neck under your left arm... I'm right handed. You will need to remove the sandpaper to check the bridge's fit. Do so often now, as outlined in step 4. (NB. take care NOT to get sanding dust under the sandpaper when you are sanding, as this will seriously damage the surface of the table!) 
 

   Step 4: using old strings if possible, and fit a top and bottom string just tight enough to hold the bridge in place. If the bridge's string slots are not already cut, you will need to do this now. (See below) Use the steel rule to measure the height of both strings above the 12th fret. Hopefully this should be a little over 2mm once they are in the slots. Remove the guide strings, and keep sanding down and checking until you get to the desired string height above fret 12. (On a mandolin, a good easy action is about 1.5mm at fret 12.)

When you think its right, finish off with a fine grade paper, say 400 or 600.

NB with a shelf bridge, fine adjustment can be to the bridge foot, though if you are careful, you can shave down the shelf itself a little. If it becomes too low, you can always add a sliver of veneer beneath the saddle, or fit a thicker saddle. With an simple bridge with a bone saddle, it is possible to make fine adjustments to the string slots, and file down the saddle top a little if it becomes too high above the strings.

   Step 5: fit your new set of strings, with the bridge at its nominal position, and tune up gradually. For old instruments, used to the stress of strings, I usually do this in 3 or 4 stages over a couple of days. Check for any buzzes or rattles. Check the open string tuning with a tuner or pitch pipe. Also check the 12 fret note (an octave up) and the harmonic on the 12th fret. All should be very close to perfect. Do this for all strings.

 Unfortunately it is impossible to get everything absolutely perfect... different strings often need slightly different scale lengths.... the compensated bridges are one attempt to remedy this problem, but nevertheless, go for the best achievable balance.

Once your bridge height is satisfactory, you may need to check the nut. The strings there can be safely lowered if you have level frets See Nut-fitting.


Cutting Bridge String Slots

(shelf or saddle bridges)

  What are we trying to achieve? We are trying to create a place which stops the string cleanly, and changes its angle to take it down to the tail, without causing any rattles or buzzes, but at the same time transmits the string vibrations down to the top to produce the sound.

 I have found Stew Mac's graduated saw set extremely useful in cutting bridge and nut slots.

Gauges are 0.008" 0.010" 0.015" 0.020" 0.025" at around 40$

   Step 1: Assuming you have no old bridge to take measurements from, set up top and bottom guide strings so that you can set the spread of the strings on the saddle. Each of the 2 outside strings, should run parallel with the side of the fingerboard, a little way in from the edge, down to the bridge. (Too close to the edge and your fingers will slip off the sides when playing!) Mark the edges of the spread with a pencil or knife on the saddle. Alternatively calculate accurately on paper as per the diagram opposite.

   Step 2: Use a piece of paper to plan out the exact location of the remaining strings. Each pair should be 2-4 mm apart (measured from the centre of the strings), the larger strings slightly more, the finer slightly less. The pairs should then be evenly spaced across the saddle, as space allows, perhaps 5-9mm apart. The determining factor is the width of the fingerboard, which determines the largest possible string spread at the bridge. (See typical set ups below.)

  Mandriola strings should be 5-7mm per course with about 6-8mm between each course.

   Step 3: Mark the string locations on the bridge or saddle with a pencil or knife. On bridges with brass saddles, mark the wooden shoulder, NOT the brass. Open up the string grooves with the needle files. The aim is to create a groove in which the string will lodge, without gripping the sides too much. Ideally the groove depth should be half the diameter of the string!? But I often go a bit deeper, especially on the fine strings. Obviously with shelf bridges, slots will be much deeper. It is possible to use old wound strings of the same gauge as files, to get the slot width correct. Angle the back of the groove towards the tailpiece with the break angle of the string. Make sure you leave the front lip of the saddle alone, to 'stop' the string cleanly, don't round it off.
   Step 4: once the bridge foot is fully fitted, you can string up the mandolin. Then will be the time to check the bridge slots and the level of the strings. Any rattles will only be apparent now. If one string has a rattle or buzz, slacken it off enough to move it to an adjacent slot, and file the back groove out a little more. You may need a hand lens and a good strong lamp to see in detail what is going on. Don't overdo it, and keep checking with the string back in place. If the bridge is fine, and there are still rattles, check the nut in a similar way.


Typical Bridge String Setups:

  Nut Width 12 Fret Width 4th space 3rd space 2nd space 1st Spread
Mandolin: 30mm 40mm 3mm 8.5mm 2.7mm 8mm 2.5mm 8mm 2.3mm 35mm
Puglisi Neapolitan mandolin: 28 37 3 9 3 8.5 3 7 3 36.5mm
Globo Neapolitan mandolin: 28 38 3.5 9 3.5 8.5 3 8 3 38.5mm
Bouzouki: (Irish) 33 44 4 9.7 3.7 9.5 3 9 2.7 41.6mm
Mandola: (Tenor) 32 43 3.3 9.5 3 9 2.7 8.5 2.5 38.5mm
Mandriola: 38 45 7 6 6.5 6.5 6 6 5.5 43.5mm